Showing posts with label Scrapbooking tutorials. Show all posts

Friday, September 17, 2010

Do you wanna play with us?

All you have to do is to create a LO based on this sketch and have fun!
Then if you join me show me what you created!
:)


Here's what i did.
A Lo using my paper collection for Scrapdiary.
Hope you liked:)


Some detaisl for you.


Now I'm into chalking again!
The cool thing about scrapbook is that you can use a re-use old stuff in a modern way!


Soon I'll be using my dimo label again.LOL
It's always a trip to find new ways for old techniques,don't you think?


Entao meninas amadas,quer se juntar a mim e brincar de fazer um Lo para esse sketch que eu desenhei?
Ele ta fazendo parte do DESK4 la no Scrapdiary,mas se voce nao participa do site e quer brincar junte-se a mim sem problemas.
A unica regra eh fazer um Lo usando o sketch e se divertir muito!
Nao esquecam de me mostrar as suas criacoes ok?
mil beijos
Luzinha

Thursday, May 27, 2010

Something old,something new...

So looking through my old files from SIStv I've found this quick tutorial to make an ATC holder.
I know it has been published at SIS back in the days.
And now I decided to share with you all this simple but verry cute project.
I hope you like and make tons of it to keep your ATCs organized.
Oh yes and Cyn this is specially for you hun!


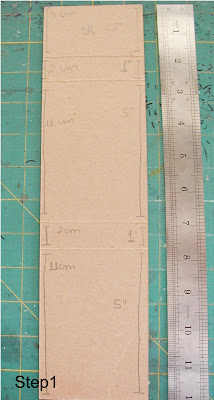
So first of all you'll need a stripe of cardbaord with
12"x3" or 30,5 cm

Entao eh muito facil de fazer essa capa para ATCs.
Voce so precisa cortar uma tira de papelao como esta da foto.
Clique na foto pra ver as medidas.
Make some folding marks along this stripe as you can see on the pic.
Using a scoring blade mark the folding lines.
Click on it to enlarge the pic.

Faca marcas com um lapis para marcar as dobras.
E depos faca vincos nas marcar para poder dobrar.
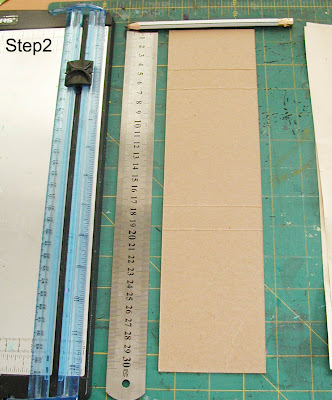
At this point you can decorate your cover.
Nesse ponto vc jah pode decorar a sua capinha.


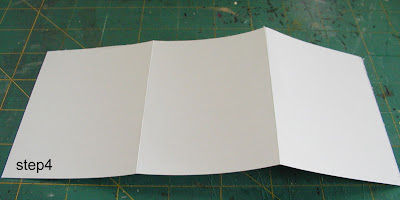
Then you'll need some sheets of plain paper.
Cut it with 5" tall x 8 1/2" long.
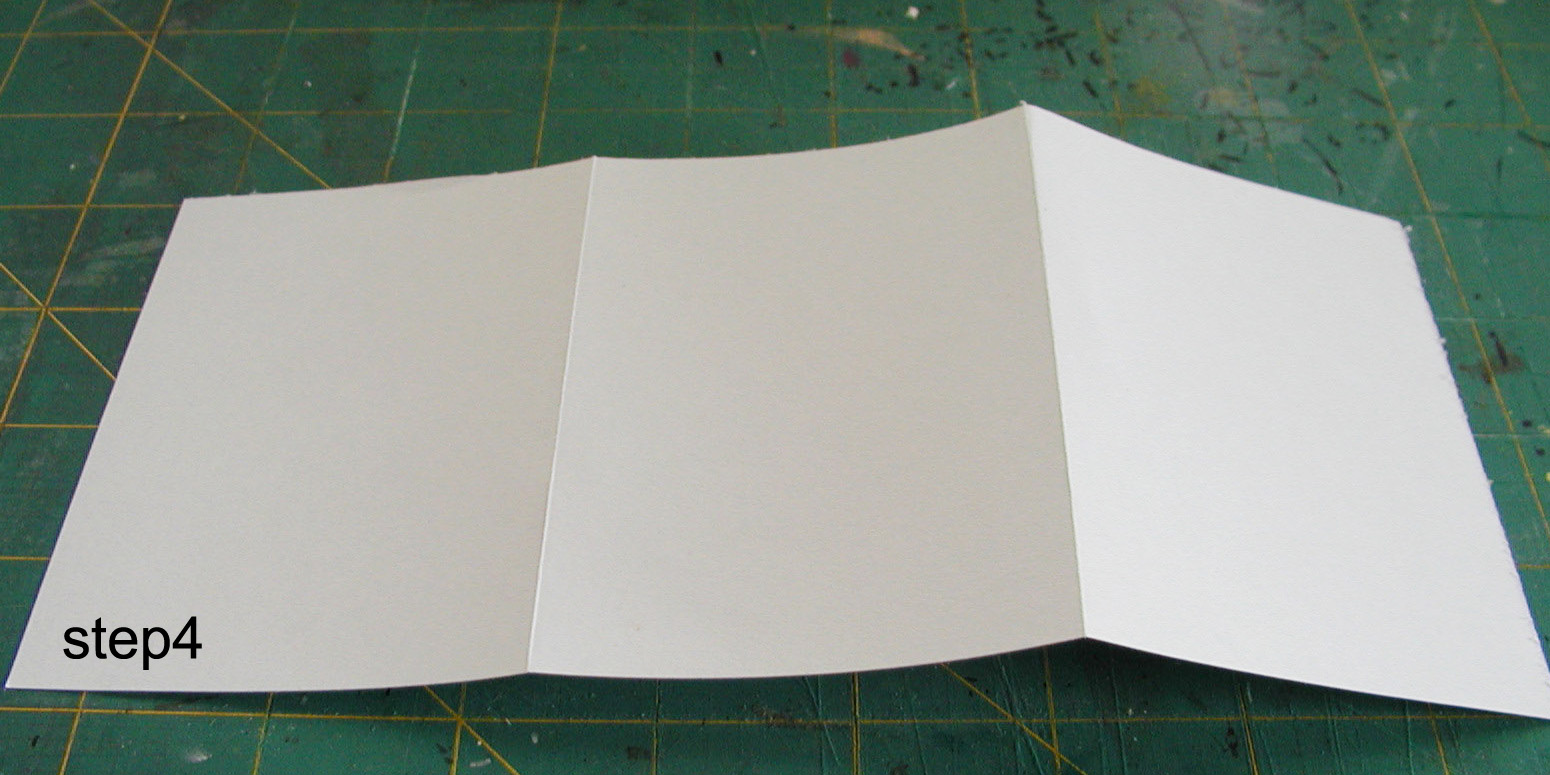
Make tree equal lines and score it.
Agora pegue folhas de papel sulfite para fazer os bolsos de dentro.
Corte com 5 polegardas de largura por 8 1/2 polegardas de comprimento.
Faca 3 marcas iguais e dobre como vc ve na foto.

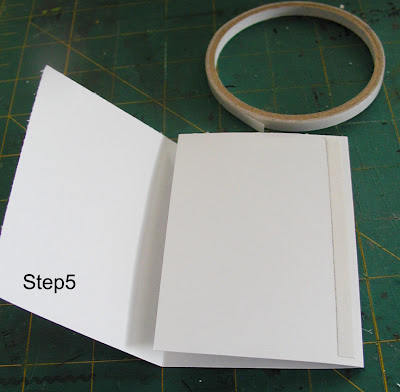
Now glue it toguether making a pocket.
You don't need to glue the low part of it,just the sides ok?
Agora cole as abas de fora formando um bolso.
Nao precisa colar embaixo,so as laterais.

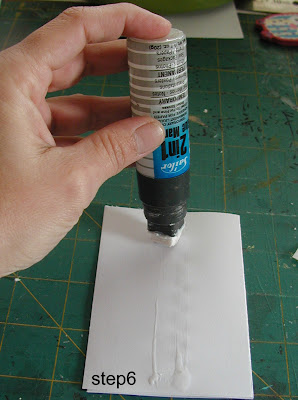
Use your fav glue to add one pocket to another right on the center of the pocket as shown on the photo.
Passe uma linha de cola bem no meio e va colando um bolso acima do outro.

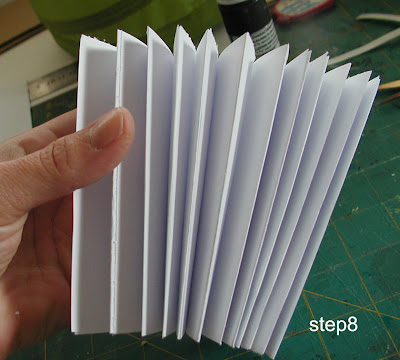
Make an acordeon with the pockets as shown uder here.
Formando um acordeon.
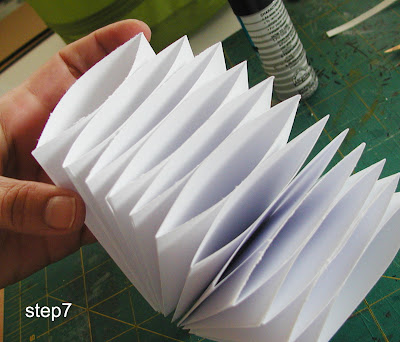


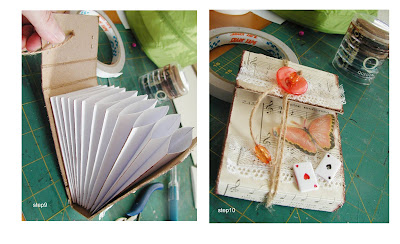
Now all you have to do is to add the pockets to it's cover gluing it just as you did with the pockets.
Agora da mesma maneira que vc colou os bolsos,cole-os na capa.
E voila ta pronto!
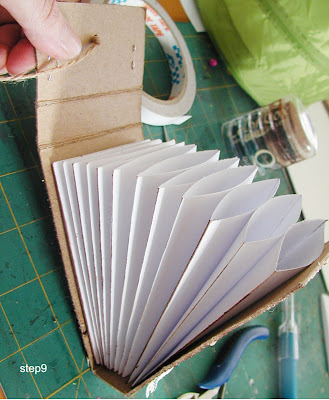
Make a small hole on the top of the cover and pass a string on it to close the cover.
Decorate it as you wish and voila!

Hope you'd enjoy it.
Cyn espero ter te ajudado qqr duvida dessa minha explicacao tosca eh soh perguntar ok?hahaha
xoxo
Lucy

Monday, May 17, 2010

Crop online is tonight.

Evening everyone:)
Let's do a LO toguether tonight?

So if you have the supplies I gave you yesterday you can start punching 4 corners of your cardstock.


Then take 4 scraps of paper and cover the punches from behind.


Now cut a polka dot red paper measuring 27 cm x 27 cm


Use the water pray to make the paper moisture.


Wrinkle the paper gently and do kike I did on the 4 corner as the photo shows you.


Use a little piece of thread to hold the corners like so.


It will looks like this.


Now hand draw 3 clouds,or use a template.
If you have never draw a cloud think about a popcorn shape. It will help you drawing it.


Now punch some circles and butterflies like these.
The largest punch has 2".
As well as the butterfly has 2"
If you don't have a musical sheet you can use a book paper.


Now layer the circles and fold in a half 4 butterflies,save one butterfly to be your base.


Glue toguether two pieces of butterflies by their bodies.
Do not glue the wings.


Attach the wings to the body.


Add a button on the lollipop flowers.

Now cut some cute images to embellish your project.


Now put them all toguether like so and voila a simple and cute project.
I hope you have enjoyed it.


See ya next time.
xoxo
Lucy

As explicacoes em portugues voces encontram no blog do Scrapdiary

Saturday, May 02, 2009

NSD tutorial.

Hi evryone and Happy NSD!
Hope you are having an awesome weekend filled with tons of creativity!
I have prepared a special tutorial for SIS and I´ll share with you now, so all of you can enjoy it too!
Have fun and hook me up with your project okay?
So let´s start the fun!

Supply list
1. 1 card board with 12 inches x 12 inches or 30.5 x30.5 cm
2. Mix of Chip boards
3. 3 colors of acrylic paint of your choice
4. Acrylic Gesso or similar white pasta
5. Glimmer mist on the same colors of your acrylics or a transparent one
6. 1 photo 7 inches x 5 inches or 18 cm x 13 cm landscape
7. Mix of stickers or embellishments of your choice
8. Mix of alphabets
9. Black sharpie
10. Some ribbons or laces
11. A little cotton rag
12. Some water’s dispenser.
13. Two soft paint brushes a medium and a large one.
14. Give me your best smile!


To start our project you’ll need to distribute the chipboards all around your cardboard.
Concentrate them in one corner.
I used the right one for it going up and on the bottom a little.


Now that the things are in place add the photo Just to see how much space you may need for it.
And glue down all the little pieces using a liquid adhesive.
Take down the photo and let’s start to prepare our background for the paint.


Once everything is glued down, give it a layer of gesso, covering all the little corners using the larger paint brush.
If you find a small corner uncovered by gesso use a smaller paint brush to reach the hard parts.
Remember if you need to add your photo under some of the chipboards, leave that corner
Free of glue so you can have the proper space for it.


Once all the gesso is dry you can start with some painting.
I have chosen pink, purple, baby blue and turquoise.
Get the first color and deep it fast into the water to have a watercolor consistence.
(Just be carful here try it in a scrap of paper before to see if you like the consistence.)
Brush part of it in pink and without cleaning the brush change for the purple color.
Now you can give it a good clean to your paint brush and change for the turquoise.
And go painting all the surface of your project.
It’s getting cool, isn’t it?


While the paint is still wet scrub a little rug all over it.
If it[s already dry make your rag a bit moisture so you can take the excess of paint from the chipboards and cardboard.
Play around, experiment new things if you like.
Try to stamp a background using different textures such as a rubber stamp or a bubble wrap plastic.
Just don’t be afraid of trying.
Once you are happy with your background you can get your glimmer mist and spray it all over!


Here you can see how the colors mix together giving it a cool effect after the rug scrubbing.


The only thing you got to do now is to make some doodles and to embellish it with stickers.

I have sewn a lace on the bottom to give it a cute finishing.
Embellish and doodle around, add your photo your journaling and your title.


You can even make a mini-mini book to add on the same project.
Mine was made out of chipboard file folders.


And here we GO,
The result is a fun unique and a colorful project to remember the best moments of your life!
Hope you had so much fun as I did.
Thank you so much for being here today with me!
And I hope to see you around soon!
XOXO
Lucy
Happy NSD!


Please note that this is for your personal use only all the images and
partial images aren´t aloud for any kind of comercial use.
If you would like to use it in a class or commercial use please feel free
to contact me.
Let´s protect together the integrity of all artist to enjoy more free
tutorials.
Thank you very much.
Lucy Folch
Protect by the copyright laws :Lei do Direito Autoral LEI Nº 9.610
e Nº 9.610
, DE 19 DE FEVEREIRO DE 1998

Por favor estas instruções e suas imagens inteiras ou parciais são para seu
uso pessoal somente, sendo proibida a sua repodução parcial ou total em aulas de
fins comerciais.
Vamos manter a integridade dos artistas para que possamos continuar
desfrutando de mais e mais aulas grátis!
Se vc quiser usar estas instruções para uso comercial por favor entre em
contato comigo antes.
Muito obrigada.
Luzinha