
Monday, May 31, 2010
Bloom and grow.
Hi you all.
Today I just come here to tell you that I have been on the cinema to watch to Sex in the City2.
Dude what a fun movie I must say.
You know when you get out of the cinema felling so light when you really had a good time?
Yeah that's what I felt.
I loooooved the movie,the clothes,the story,Carrie's make up is beautiful.
The songs are so fun.
The whole movie is FAB!
If you haven't seen it I highly recomend.
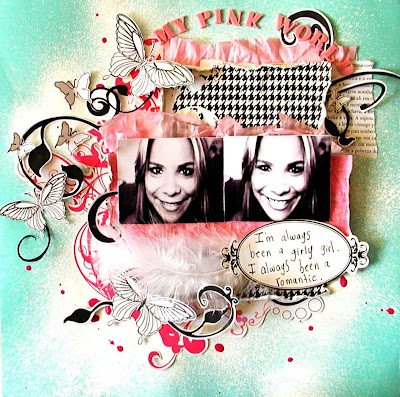
And to don't let you without any project here is one I did few months ago.
Hope you like it.
xoxo
Lucy

Stay tuned for a new LO tutorial any time during this week:)
Today I just come here to tell you that I have been on the cinema to watch to Sex in the City2.
Dude what a fun movie I must say.
You know when you get out of the cinema felling so light when you really had a good time?
Yeah that's what I felt.
I loooooved the movie,the clothes,the story,Carrie's make up is beautiful.
The songs are so fun.
The whole movie is FAB!
If you haven't seen it I highly recomend.
And to don't let you without any project here is one I did few months ago.
Hope you like it.
xoxo
Lucy

Stay tuned for a new LO tutorial any time during this week:)
Friday, May 28, 2010
O Kiss the maio
Here're some new LOs I did using the gorgeous may collection "Random things" from Scrapdiary:)

And here I just did the same thing like the tutorial from few days ago.
Just added the wrinkled paper on the left side of the page.

Hope you like it and fell inspired to create cool stuff this weekend.
And I would like to leave you today with the cutes quote I ever read...I'd just copy it from Kimmie's gorgeous blog
"Art is the only way to run away without leaving home. ~Twyla Tharp"
See ya!
xoxo
Lucy
Thursday, May 27, 2010
Something old,something new...
So looking through my old files from SIStv I've found this quick tutorial to make an ATC holder.
I know it has been published at SIS back in the days.
And now I decided to share with you all this simple but verry cute project.
I hope you like and make tons of it to keep your ATCs organized.
Oh yes and Cyn this is specially for you hun!
So first of all you'll need a stripe of cardbaord with
12"x3" or 30,5 cm
Entao eh muito facil de fazer essa capa para ATCs.
Voce so precisa cortar uma tira de papelao como esta da foto.
Clique na foto pra ver as medidas.
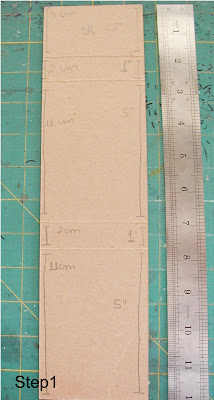
Make some folding marks along this stripe as you can see on the pic.
Using a scoring blade mark the folding lines.
Click on it to enlarge the pic.
Faca marcas com um lapis para marcar as dobras.
E depos faca vincos nas marcar para poder dobrar.
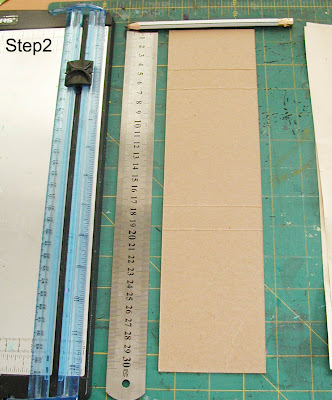
At this point you can decorate your cover.
Nesse ponto vc jah pode decorar a sua capinha.

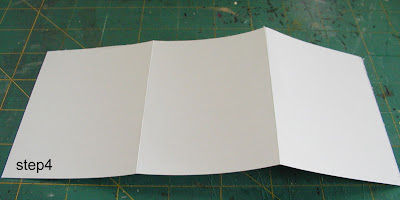
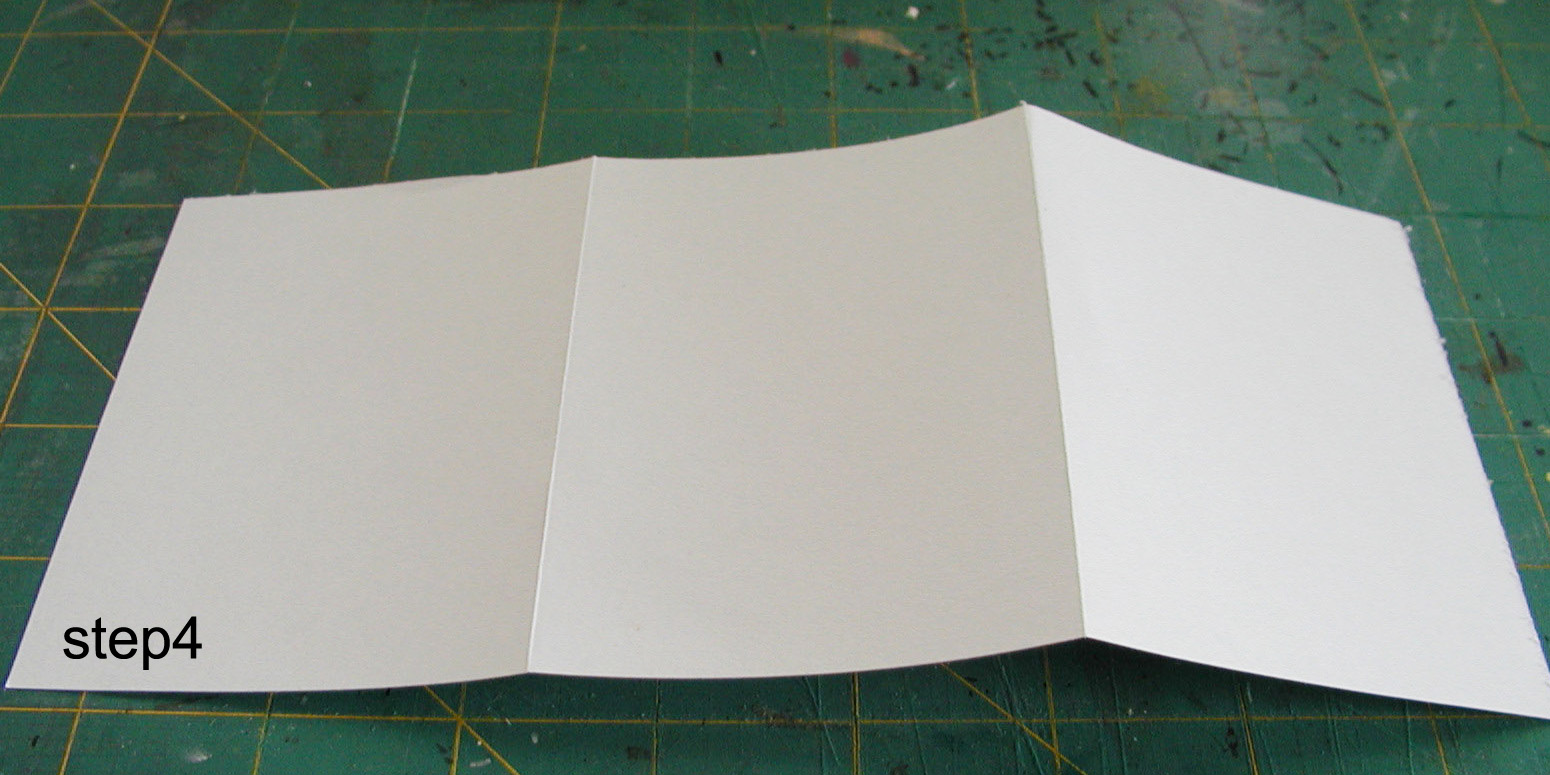
Then you'll need some sheets of plain paper.
Cut it with 5" tall x 8 1/2" long.
Make tree equal lines and score it.
Agora pegue folhas de papel sulfite para fazer os bolsos de dentro.
Corte com 5 polegardas de largura por 8 1/2 polegardas de comprimento.
Faca 3 marcas iguais e dobre como vc ve na foto.
Now glue it toguether making a pocket.
You don't need to glue the low part of it,just the sides ok?
Agora cole as abas de fora formando um bolso.
Nao precisa colar embaixo,so as laterais.
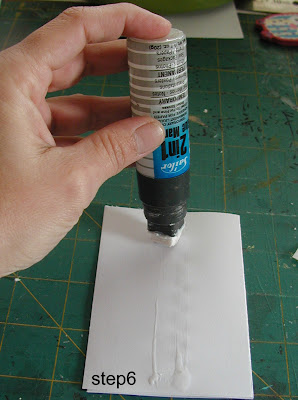
Use your fav glue to add one pocket to another right on the center of the pocket as shown on the photo.
Passe uma linha de cola bem no meio e va colando um bolso acima do outro.
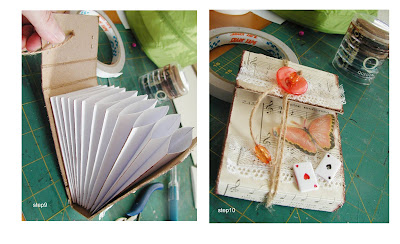
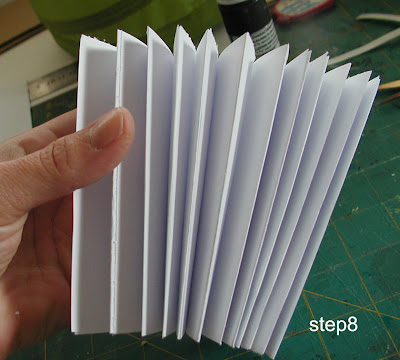
Make an acordeon with the pockets as shown uder here.
Formando um acordeon.

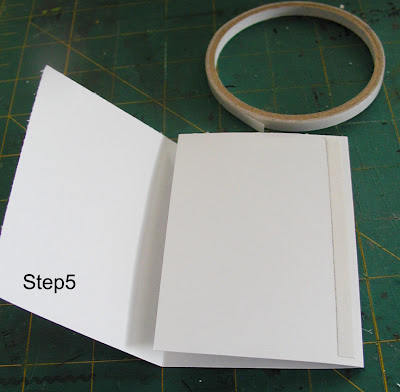
Now all you have to do is to add the pockets to it's cover gluing it just as you did with the pockets.
Agora da mesma maneira que vc colou os bolsos,cole-os na capa.
E voila ta pronto!

Make a small hole on the top of the cover and pass a string on it to close the cover.
Decorate it as you wish and voila!

Hope you'd enjoy it.
Cyn espero ter te ajudado qqr duvida dessa minha explicacao tosca eh soh perguntar ok?hahaha
xoxo
Lucy
I know it has been published at SIS back in the days.
And now I decided to share with you all this simple but verry cute project.
I hope you like and make tons of it to keep your ATCs organized.
Oh yes and Cyn this is specially for you hun!

So first of all you'll need a stripe of cardbaord with
12"x3" or 30,5 cm
Entao eh muito facil de fazer essa capa para ATCs.
Voce so precisa cortar uma tira de papelao como esta da foto.
Clique na foto pra ver as medidas.

Make some folding marks along this stripe as you can see on the pic.
Using a scoring blade mark the folding lines.
Click on it to enlarge the pic.
Faca marcas com um lapis para marcar as dobras.
E depos faca vincos nas marcar para poder dobrar.

At this point you can decorate your cover.
Nesse ponto vc jah pode decorar a sua capinha.

Then you'll need some sheets of plain paper.
Cut it with 5" tall x 8 1/2" long.
Make tree equal lines and score it.
Agora pegue folhas de papel sulfite para fazer os bolsos de dentro.
Corte com 5 polegardas de largura por 8 1/2 polegardas de comprimento.
Faca 3 marcas iguais e dobre como vc ve na foto.
Now glue it toguether making a pocket.
You don't need to glue the low part of it,just the sides ok?
Agora cole as abas de fora formando um bolso.
Nao precisa colar embaixo,so as laterais.

Use your fav glue to add one pocket to another right on the center of the pocket as shown on the photo.
Passe uma linha de cola bem no meio e va colando um bolso acima do outro.

Make an acordeon with the pockets as shown uder here.
Formando um acordeon.


Now all you have to do is to add the pockets to it's cover gluing it just as you did with the pockets.
Agora da mesma maneira que vc colou os bolsos,cole-os na capa.
E voila ta pronto!

Make a small hole on the top of the cover and pass a string on it to close the cover.
Decorate it as you wish and voila!

Hope you'd enjoy it.
Cyn espero ter te ajudado qqr duvida dessa minha explicacao tosca eh soh perguntar ok?hahaha
xoxo
Lucy
Wednesday, May 26, 2010
Crazy crop online.
Okay...so let me see if I can explain it for you in a way that makes sence...LOL
There is this French forum were the talented and creative ladies make some fun crops online.
Then a brazilian fellow scraper Dica who speaks french had proposed us to play along while she would translate it for the brazilians.
So the theme this time was Alice in wonderland.
She started saying that we should follow some steps while she was telling us a fun story.
To begin with we had to choose between two ways to follow.
I choose to drink,for it I had to use some paint or ink on my background.
Next stop was on the Queen of hearts and the queen demanded us to use a deck card of hearts and use something pink or red on the project.
Then she sent us to that blue catterpilar and we had to use some circles to remind us the beautiful silhouete of the bug.LOL
And also the catterpilar said that we had to use two different fonts and a really big title.
After that the small rat said we had to use numbers on the project.
So after all these fun steps my LO was born!
But there is another way to take...passing trough the mad hat guy and the bunny etc.
I'll make the other part for a new LO.
But for now I'll let you with this one.
I hope you enjoy it.
xoxo
Lucy


Pra quem perdeu a chance de brincar com a Dica ontem a noite eu recomendo que vc nao perca a chance de fazer o seu LO inspirado na historia da alice.
Eh um crop online no SD mega divertido aonde vc vai seguindo os passos dados pela historinha pra fazer o seu LO.
Corram la pq vc pode fazer no seu tempo.
beijao
Luzinha
Monday, May 17, 2010
Crop online is tonight.
Evening everyone:)
Let's do a LO toguether tonight?
So if you have the supplies I gave you yesterday you can start punching 4 corners of your cardstock.
Let's do a LO toguether tonight?
So if you have the supplies I gave you yesterday you can start punching 4 corners of your cardstock.

Then take 4 scraps of paper and cover the punches from behind.

Now cut a polka dot red paper measuring 27 cm x 27 cm

Use the water pray to make the paper moisture.

Wrinkle the paper gently and do kike I did on the 4 corner as the photo shows you.

Use a little piece of thread to hold the corners like so.

It will looks like this.

Now hand draw 3 clouds,or use a template.
If you have never draw a cloud think about a popcorn shape. It will help you drawing it.

Now punch some circles and butterflies like these.
The largest punch has 2".
As well as the butterfly has 2"
If you don't have a musical sheet you can use a book paper.

Now layer the circles and fold in a half 4 butterflies,save one butterfly to be your base.

Glue toguether two pieces of butterflies by their bodies.
Do not glue the wings.

Attach the wings to the body.

Add a button on the lollipop flowers.

Now cut some cute images to embellish your project.

Now put them all toguether like so and voila a simple and cute project.
I hope you have enjoyed it.

See ya next time.
xoxo
Lucy
As explicacoes em portugues voces encontram no blog do Scrapdiary
Sunday, May 16, 2010
Crop online 05/17
Hi you all.
I wanna invite you to join me tomorrow at 21.00pm for a crop online.
It will be live at Scrapdiary,however I'll post here for you all too.
Hope to see you.
Take a note of jat you'll need for ths project
1 white cardstock
some colorfull patterned paper
water spray bottle
4 buttons
some thread
a music sheet
circle punches large,medium and small
a medium butterfly punch
thickers
and a photo,I have used a big one however you can use as many as you like and in any size.
And this is all you'll need.
xoxo
Lucy
The sneak peak for you:)
The papers are from Scrapdiary Random collection.

Ola queridas e queridos,
Queria convida-los para mais um crop online amanha as nove no Scrapdiary.
Eu vou postar os passos aqui depois tmb pra todos vcs.
mas por enquanto anotem ai o que vcs irao precisar.
xoxo
Luzinha
I wanna invite you to join me tomorrow at 21.00pm for a crop online.
It will be live at Scrapdiary,however I'll post here for you all too.
Hope to see you.
Take a note of jat you'll need for ths project
1 white cardstock
some colorfull patterned paper
water spray bottle
4 buttons
some thread
a music sheet
circle punches large,medium and small
a medium butterfly punch
thickers
and a photo,I have used a big one however you can use as many as you like and in any size.
And this is all you'll need.
xoxo
Lucy
The sneak peak for you:)
The papers are from Scrapdiary Random collection.

Ola queridas e queridos,
Queria convida-los para mais um crop online amanha as nove no Scrapdiary.
Eu vou postar os passos aqui depois tmb pra todos vcs.
mas por enquanto anotem ai o que vcs irao precisar.
1 cardstock branco O kiss de maio(quem nao tiver pode usar outros papeis que vcs tenham em casa) um borrifador de agua. 4 botoes(eu usei de madeira,mas qqr um serve) 4 pedacos de cordinha ou fita,fio encerado,alguma coisa que de pra amarrar. Se vc tiver um papel de partitura musical pode usar tambem. 1 furador de bola grande,medio e pequeno 1 furador de borboleta medio ou quem tiver silhouette,cricut etc pode cortar 5 se vc nao tem desenhe um molde. qqr alfabeto pro titulo. A foto eu usei uma vertical tipo 18x15cm mais ou menos mas qqr foto cabe e vc pode usar ate mais de uma foto se vc quiser. e eh so isso! Amaha eu volto com a aulinha ok? Vou postar as fotos dos passos no blod do SD pra voces poderem acompanhar melhor. mil beijos e ate amanha. |
| |
xoxo
Luzinha
Thursday, May 13, 2010
Aqui estao.
Here they are.
Sorry I've been so MIA lately.
It's just I'm not feeling good about SIS signing of the cyber space...
Anyway here are the LOs I did for a Book in Sweden.
TFL
Ahhh And let me know whatcha ya think bout my new blog?
It's fierce,Fierce isn't it?
The amazing Barbara did it for me.
Thanks girl you simply ROCK!

A pedidos estou postando aqui os 2 ultimos projetos que eu coloquei no SD.
:)
Fala serio e me digam se meu blog nao ficou maravilhoso com o makeover da Babi?
Gente ela eh muito profissa!
Obrigada minha flor vc abala!
See ya.
Sorry I've been so MIA lately.
It's just I'm not feeling good about SIS signing of the cyber space...
Anyway here are the LOs I did for a Book in Sweden.
TFL
Ahhh And let me know whatcha ya think bout my new blog?
It's fierce,Fierce isn't it?
The amazing Barbara did it for me.
Thanks girl you simply ROCK!


A pedidos estou postando aqui os 2 ultimos projetos que eu coloquei no SD.
:)
Fala serio e me digam se meu blog nao ficou maravilhoso com o makeover da Babi?
Gente ela eh muito profissa!
Obrigada minha flor vc abala!
See ya.
Subscribe to:
Posts (Atom)